


A 72-hour Bug Out Bag (a.k.a. Get Out Of Dodge bag) is a pack filled with the necessary items to sustain you while you walk from an unsafe location to a safe location. Usually the scenario is that “home” is no longer safe and you need to go to some predetermined “bug out” spot. This could be either a friend’s or relative’s house, a family cabin, or a government shelter. Basically, you are going on a hiking trip with an expected start and end point on a pre-planned route during what will most likely be a time of great personal and local stress. The objects you put in this bag are to help you make this trip. They are not intended to allow for long-term survival or to help you restart civilization when you get to the other side, as thinking for the long term in this situation will distract or potentially cause you to fail in getting from point A to point B.
This article will go over three main topics– 1) Picking a bug out location, 2) Picking a bug out route, and 3) Packing for the journey.
Picking A Bug Out Location
As the saying goes, failing to plan is planning to fail. The most important part of having a 72-hr Bug Out Bag is having a pre-planned destination. This idea of having a set A to B distance to travel is what separates a 72-hr Bug Out Bag from a Refugee Bug Out Bag. Before you start throwing camping supplies into an old backpack, it is absolutely essential that you know where you are going. The distance and obstacles between you and your destination is what determines how you will pack your bag.
Where should you go? This depends on your unique situation.
A safe haven in a crazy time should:
- Be populated by people you trust,
- Have resources available to support you when you get there, and
- Be within a walking distance that is achievable with your current level of physical fitness.
Some people have family members that they get along with great that live within walking distance. Others have a friend that meets this requirement. Maybe you have a cabin where you plan to ride out a storm. Pick the place that is right for you.
If you do not own the location that you plan on going to, it is essential that you ask the people who live there for permission to come there in a time of emergency. The last thing you want to do is survive a harrowing journey and get turned away at salvation’s door because you weren’t as good friends as you thought you were.
By asking ahead of time, you get the idea on the other person’s radar and allow opportunities to make the second requirement of a safe place happen. If they are fine with you crashing at their place, they will probably be okay with you leaving a container with some food and supplies at their house so you wouldn’t be a burden if you showed up unannounced.
In this case, it’s a good idea to stock a sealable storage chest with food and other supplies that you can store at your bug out location. If there is an emergency and you get killed on the way to your bug out location, at least they are your friends and someone you like will be able to use your stuff.
When I was looking for a bug out location, my in-laws seemed to have the perfect setup. Located near a clean lake, rural, and with a tight knit community. I asked my father-in-law if I could store some food at his place so we wouldn’t be a burden in case we had to crash at his house in an emergency. Initially he said I should just pack up my own stuff and bring it with me if it was necessary. So I built a “to-go” food crate that I stored at my apartment. The next time we saw each other, he asked if I had done my part. When he learned I had, he realized I was serious, and after some research of his own he ended up buying a full year’s supply of dried food to prepare for an emergency and be ready if my wife and I did show up someday.
Finally, it is unrealistic to pick a primary bug out location that is a 30 day walk away. If there is an emergency going on that forces you to take such a trip without a vehicle, the odds of you making it are realistically slim.
If you plan on bugging out with a your super zombie apocalypse jeep and can’t imagine leaving it, you have already failed. Disaster planning is about planning for worst case scenarios. The odds of a disaster happening where you need to leave your house and head out on your own where all roads are still passable is highly unlikely. Having an ideal location a few states away is fine, but don’t neglect to plan for an emergency where you will be forced to travel only as far as you are willing or able to walk.
Picking A Bug Out Route
Once you have selected a destination you would go to if an emergency forced you to leave your house and normal infrastructures, like hotels are not available, you need to look at the route between point A and B.
Google Maps can prove to be invaluable for this task. Here are some questions to ask as you look over route options between points A and B:
- Are there any natural obstacles? (rivers, mountains, deserts, valleys, et cetera)
- Are there any man-made obstacles? (bridges that may be closed or blocked, containment walls, natural choke points where traffic will stop, et cetera)
- Are there any major cities or towns to pass through? (more people, more problems)
Pick a route that will have the least resistance. It makes sense to plan a few different routes, both for foot travel and vehicle travel, if you are able to take your car. Ideally, if you leave from your house early enough you may be able to beat the rush and take your car and have the luxury of being able to bring more supplies than just what you can carry on your back, but make sure you consider which routes will be better for walking or driving.
Once you have at least three routes to your location picked out, print out the step-by-step directions on Google maps with the pictures for each step. You can pack these in your bag.
Try driving or hiking each of the routes, once you pick them; you may be able to notice shortcuts or potential problem areas that you couldn’t see on Google.
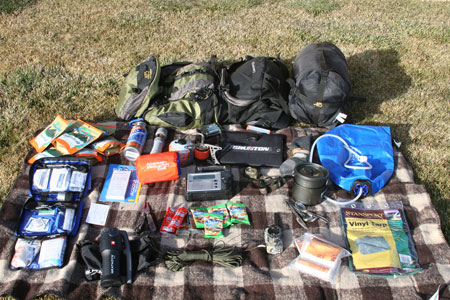
Packing For The Journey
Now that you have selected a bug out location and identified the route you want to take, it is time to start thinking about what you need to bring on your trip.
The 72 hour nature of the bag is entirely dependent on how long you think it will take you to walk from point A to point B. If your destination is going to take a week to reach on foot, guess what? Your 72-hr bag just became a 168-hr bag. It’s only a short trip across town? You probably don’t need to carry three days worth of supplies (though better safe than sorry, especially if you don’t have anything pre-positioned at your point B location).
The Bug Out Bag has received almost a mythical status in preparedness communities, but in reality all you are doing is going on a hiking trip. When going on any hiking trip, your destination, length of journey, and obstacles you face obviously dictate what you pack.
When you are packing your bag, you need to think about a few things:
- Weight,
- Basic needs, and
- Needs unique to your route
Weight
Talk to any long distance hiker about their gear and all they will rave about is how they were able to optimize their pack for the lowest weight. The amount of weight your pack contains will dictate how much energy is required to get you to point B. The bag is there to help you make the trip not vice versa, and over packing can be just as deadly as under packing.
Before you even start picking items to bring, you need to understand the limits of what you can carry. Ideally everyone would like to bring their grandmother’s wood stove and a year’s worth of food and ammo, but you can’t do that. Try filling a backpack with different amounts of weights and walking around your living room. Then walk three miles. How heavy does it feel now?
No, you probably won’t do this important step. It’s your funeral, if you don’t.
Basic Needs
Your 72-hr bag needs to have the items necessary for basic human survival. The items here will build upon what you already have available in your Every Day Carry kit.
There is a well known rule about three, which you may have heard: You can’t live three minutes without air, three hours without shelter (in the harshest elements), three days without water, or three weeks without food.
Air. Most likely the air will be clear for your journey, and unless you are really paranoid you probably won’t need to worry about packing a full out Gas Mask or air purification system.
What could come in handy though are some N95 Masks in case there is heavy smoke you need to cross through. These are very low weight and won’t take up much space in your pack. A multi-purpose (but not as effective) alternative would be to include a bandana that could be used for a variety of purposes, including a large particle breath filter, which is better than nothing.
Shelter. The first level of shelter you always need to think about is your clothes. What you should pack here is the same as what you need in a Get Home Bag. Plan on having multiple layers that can be removed if not needed. Clothing items you need include:
- Socks
- Convertible Hiking Pants
- Three+ pairs of Compression Shorts
- Long Sleeve or Short Sleeve, breathable undershirt
- Mechanics Gloves
- Baseball Cap or Boonie Hat, and pair this with a Bug Net to to help minimize hassle from mosquitoes.
- Rain Gear
Your top layer of clothing is especially seasonally dependent. In the summer, an extra t-shirt or two may suffice. In the winter, you will want to make sure you have access to multiple layers, in case you need to survive a frigid night outside.
When packing clothes, please don’t have military grade camo. Dress like a normal person. If you look like a threat, people will treat you like a threat. If you show up at someone’s door looking like an extra in a Rambo movie, you will be much less likely to get help than a normal person with a camping backpack.
In addition to clothes, make sure you have skin protection, such as sun screen and chap-stick. A bandana can also be used around your neck to keep it protected.
That covers the immediate shelter offered by clothing, but the next step is looking at additional items to bring that can help you if you need to plan on staying the night outside. One way to minimize weight and the size of your kit is to plan on packing a hammock instead of a tent and ground pad. This is, of course, provided that you have lots of trees in your area.
There are some great camping hammocks on the market. Just make sure you get one with a built-in bug net. Instead of spending money on a purpose built rain fly for your hammock, just buy a tarp instead and invest the money you saved elsewhere. Don’t forget hammock straps to attach your hammock to the trees.
If you dislike the idea of sleeping suspended in the air, a more traditional camping setup may work better for you. Most campers will have a ground mat, bedding, and some sort of environmental protection.
A ground mat is a must have, it insulates you from the earth and helps provide some cushion. A sleeping bag or even emergency bivvy should be good enough bedding to keep you isolated from bugs and other critters. But unless you plan on getting a waterproof bag, you need some sort of shelter. A tarp can be used as a makeshift tent or shelter, if you don’t want the weight of a single person tent.
When planning your route, keep an eye out for natural areas that offer shelter. An overhanging rock or abandoned house could provide much better protection than an open field.
Another element of shelter is fire. As we will discuss in the food section, for a short-term bug out you should try to avoid drawing attention to yourself, and fire certainly draws attention. If at all possible avoid starting fires, as the smell and smoke are sure to draw people’s gaze. Nevertheless, you should have the resources available to make a fire if need be. Pack a simple Bic lighter as your primary fire source. A good backup that works, even if it gets wet, is a firesteel. Just make sure you practice with the firesteel beforehand so you know what you need to get a fire going.
Last on the idea of shelter is personal protection. Try to plan your route to avoid unnecessary encounters with people, but prepare for conflict, because wherever people are there are problems. A nice non-lethal defense option is mace. You should already be planning on carrying a survival knife, which could be used for intimidation or protection, and the last place to look to is a firearm. A personal defense firearm is a lot of weight to carry but very useful if needed. A small pistol can be tucked away from sight so you don’t look like a threat from a distance. If you are traveling through what you expect to be a very hostile area, you may be able to carry a rifle, depending on the severity of the situation. Just remember that many states don’t allow open carry of rifles, and just because your world may be collapsing doesn’t mean that you won’t get arrested or shot for looking like a threat. If at all possible avoid open displays of weaponry unless absolutely necessary.