


M1 Garand cartridge belts and Altoids tins are a match made in prepper’s heaven. You may already have some of these vintage items gathering dust. If not, they are easy to find. Together they can be a literal lifesaver, more capable than smaller survival kits and far less bulky than the typical bugout bag.
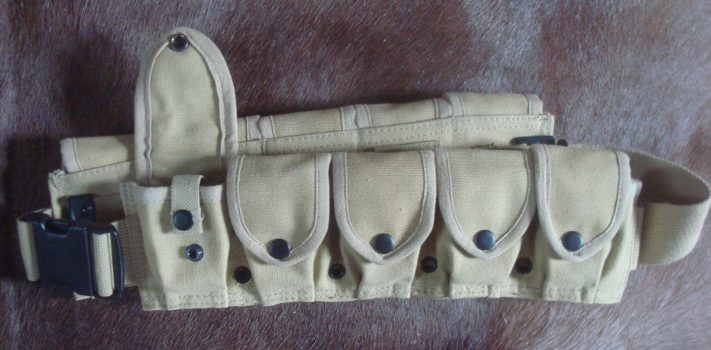
The M1 cartridge belt is an adjustable canvas belt with 10 snap-closure pockets, each measuring approximately 3 ¾” x 2 ¾” x 1”. It was standard issue from about 1910 until the full adoption of the M14 rifle in the late 1950s. The belt was originally designed to carry 100 .30-06 cartridges in 5-round stripper clips. When the Garand came along, GIs instead used these to carry ten 8-round en bloc clips instead. Coincidentally, Altoids tins, at about 3 ½” x 2 ½” x ¾”, also fit just fine…but you probably don’t need ten tins of breath mints. The good news is that lots of other things fit in them when the candy is gone.
Things Came In Tins
When I was young, lots of great things came in tins. Empty, they could be used in any number of ways. Prince Albert tobacco tins, for example, made perfect back-pocket fishing kits. A few worms, a hook, some line wrapped around the outside, and you were set for the day. Band-Aid tins were thicker and didn’t fit my Levi’s as well, but held more marbles or baseball cards. Even Premium saltines came in tins: big ones, maybe five inches square and a foot long. I now wish that I had a hundred of them.
Altoids tins are about the only ones left. I doubt there’s a prepper of my generation who didn’t turn an Altoids tin into a shirt-pocket survival kit, or perhaps a first-aid kit. These are still viable projects. In recent years, recycling Altoids tins has become virtually a cottage industry. There is seemingly no limit to the ways they have been reused. They are particularly popular for small electronic devices. At the end of this article I have included links to some of the most popular and ingenious uses. Many of these projects tend to be just-for-fun, but the solar iPhone charger could have a practical application. The tins are so useful that they can even be bought empty, and in any quantity you might require. Twelve cost about $12 at Amazon. Unless you really hate the Altoids label, you might as well buy them filled and eat the candy.
Where It All Began
I began with a shirt-pocket survival kit – I don’t recall what brand of tin I used. The concept is simple: a container small enough to have with you all the time, packed with tools to make fire, purify water, catch food, treat minor injuries and find your way back to civilization. These took a little ingenuity. At the time a lot of handy items were not readily available for purchase. I had to waterproof matches with nail polish. The best fire starters we had were charcloth and extra-fine steel wool. Cotton balls saturated with Vaseline worked, but were rather messy. Nobody made neat little towelettes and sterile swabs in mylar pouches. Superglue hadn’t been invented. We didn’t even have duct tape! My early kits were built around a button compass, fishline, hooks and sinkers, a single-edged razor blade or X-Acto knife, waterproof matches, a few band-aids and a small container of antiseptic, and a carefully-folded sheet of aluminum foil. I ‘tested’ my kits on day hikes in the woods, caught and cooked a few fish, and went home convinced I could conquer the world.
Maybe I could have. Confidence is probably the most important survival tool. I had spent many hours studying my dad’s copy of How to Survive on Land and Sea, the US Navy WW II survival handbook. I could make primitive shelters and get water from vines. But rural Massachusetts in the 1950s and 1960s was hardly ‘wilderness’.
The pocket Altoid survival kit has come a long way in 60 years. One of the best updates I have seen was published in Field & Stream magazine, in 2006. It features a tiny magnesium ‘mini-match’, commercial tinder bundles, and a tiny LED flashlight, none of which were on the market “back in the day.” It’s not much, but better than nothing. A smart person who keeps calm and makes good use of the contents will do okay.
First Aid
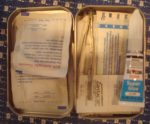 Two kits – one for fire, food and direction-finding, and the other for first aid – were my next step. Hey: my hunting shirts had two pockets, so two kits seemed like a better way to go. Having a whole Altoids tin for treating simple injuries and illnesses allows one to add a lot of great stuff. A typical kit might contain assorted bandages, tape and gauze, moist towelettes and sterile swabs, Q-tips, antiseptic, razor blades, super glue, dental floss, a few OTC medications like aspirin, antacid and Immodium, tweezers for splinters, maybe even a sterile suture or a packet of hemostatic blood-clotting granules for serious cuts.
Count to Ten
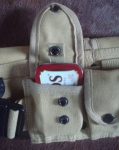
If two kits are good, ten are five times better. Buy yourself a Garand clip belt. They adjust to fit waists to 48”. Originals can sometimes still be found for reasonable prices, but collectors are now bidding them up. A decent reproduction runs about $40. Set the survival kit aside and pop the first aid kit in the second pocket of your M1 cartridge belt. The third pocket gets a combination tool (Leatherman or equivalent) and a match safe with compass. If you can find one with a whistle, so much the better. If not, add one. Slide a signal mirror in the back. Metal mirrors are more durable than plastic. Very few people know Morse Code these days, but the flash of a mirror will attract attention when you need it most.
My fourth pocket holds a mylar space blanket and a wire ‘commando’ saw. You can wrap yourself in the blanket, or use it to make a lean-to that will reflect heat from an open fire. Fold the plastic around a pebble and tie it with string to create an anchor point in each corner. Then you can suspend the blanket from a low-hanging branch or a frame lashed together from sticks. The next section of my belt contains a small stove (another Altoids tin, see the link below) with a few heat tabs. I have a crank-operated flashlight in pocket six; a battery-powered LED light would be even more compact, leaving room for a small packet of tissues in a ziplock waterproof bag. Tissues are so much better than leaves for personal hygiene!
So far we have taken care of minor injuries, direction-finding, and signaling. We can stay warm and see what we are doing. Water storage and treatment is pocket seven: a heavy-duty quart ziplock bag and water purification tablets will do the trick. Add a coffee filter to remove sediment. An oven bag will allow you to boil water (carefully!) without a pot. A few packets of salt might be a good idea in hot climates.
 Pocket number eight could hold another tin with a couple of teabags, sugar, and some bouillon cubes. Not exactly a hearty diet, but something to warm and cheer you. The sugar provides a little caloric boost, and caffeine will help keep you alert. A good-sized sheet of aluminum foil, folded and creased, takes up very little space and is very nice to have. It can make a cup for the tea or wrap a fish for cooking in the embers. You could even put it in your hat – not to protect you from cosmic rays, but to help maintain body temperature. The old rule of thumb that we lose nearly half of our body heat through our heads has been discredited, but 10% gain or loss is still significant. Use a plastic vacuum-sealer bag instead of a tin for food items, and you could probably squeeze in a packet of cocoa mix or dehydrated soup. In the next compartment I have a fishing kit, with hooks, line, sinkers, synthetic ‘bait’, flies and jigs and a length of snare wire.
The ninth pocket contains rubber tubing and a leather patch for making a slingshot, with large ball bearings or lead balls for ammunition. Find and cut a good forked branch, and you are ready to hunt small game. The rubber tubing will also serve as a tourniquet in the event of a major injury.
Pocket ten is up to you: a hank of paracord has many uses. Some folks braid it into a bracelet so they always have some on hand. Since not all emergencies occur in a howling wilderness, a prepaid charge card with a $25 balance might be handy. Speaking of charge cards, there are credit-card sized survival tools for sale. They typically offer a small saw, fish hooks, spear points, needles, tweezers and other handy gadgets. I haven’t tried any, but online reviews seem positive. Do your own research, or better yet, test one thoroughly before trusting it in a life-or death scenario. If the SHTF, a roll of silver dimes would provide purchasing power in a small package. Fifty rounds of .22 rimfire ammunition would be a good accompaniment to the takedown Ruger 10/.22 in your car. YMMV. Some things I consider essential may not be useful where you live. There’s not much fishing in the Mojave.
I sometimes add a GI canteen and cup to my cartridge belt. The wire hanger bracket fits into the grommets on the bottom edge of real army surplus belts. It may not fit aftermarket belts like the Indian import in the photos. But a canteen adds bulk, and it adds weight – water weighs about a pound per pint. Another option is the old Sierra Club cup. It is made of stainless steel. The handle hooks around your belt, so that the cup rides comfortably and almost unnoticed. It’s also a good match for the little Altoids-tin stove.
Stored Between Your Ears
Knowledge and experience take up no space. Study your environment. Know the geography, and bring a map of the area even if you carry a GPS. Batteries die, and electronics fail. Understand local weather patterns, and make it a habit to check the forecast before heading out. Practice building a shelter and starting a fire with the materials you’d have in the wild. Learn to recognize a few of the most common edible plants. Think about how you would deal with an emergency situation, so that you have a plan to follow. The more you know, the less you’ll worry. Always let someone know where you are going and how long you anticipate being gone.
If you kept count, you probably noticed that I skipped the first pocket. Mine holds a very small edition of the New Testament, stowed in a waterproof bag. As Frank Herbert wrote in Dune:
“I must not fear. Fear is the mind-killer. Fear is the little-death that brings total obliteration.”
Panic kills more people than thirst, freezing cold, or grizzly bears. It makes you forget what you know so that you end up making a bad situation worse. If you find yourself giving in to fear, get out of the weather as best you can, sit down, and read a chapter or two. The familiar words will be a comfort in themselves. Think about what you have read, and there will be that much less room in your mind for fear. If you can, gather wood and tinder and make a fire. As soon as you are missed, people will be looking for you. Nine times out of ten, someone will find you before very long. Running around aimlessly makes you harder to find and increases your chance of injury.
Your M1 Garand belt survival kit will give you the tools you need. Practice provides the skills. A calm demeanor allows you to use the tools and skills to best advantage.
Some Useful Links
- Undecorated New Altoids Tins
- Reproduction WW2-style M1 Garand Belt
- Credit-card ‘survival tools’
- Field & Stream Survival Kit in an Altoids Tin
- Altoids Tin First Aid Kit
- Altoids Tin Backpacking Stove
- Another Altoids stove, using cardboard and paraffin wax for fuel
- Mighty Minty Boost Solar IPhone Charger
- Raspberry Pi Computer Case
- Minty MP3 Player
Great topic and article that is close to my heart. The more one knows, the less they need. But where to begin? Knowing how to start fire is the most important skill to have. This could be a subject in itself. Some of the best tools however are not as compact as we’d like.
Such is the typical ferro rod, a must have as it is the most reliable way to start a fire. Along with a strong 3 to 5 inch full tang knife with tinder attached, is also the ferro rod that goes around the neck. Day and night, it is there. I could also include a miniature Bic lighter, and an small LED light. Light might be required to find suitable material for a fire, however, flicking the Bic lighter while shielding one’s eyes also works. The ferro rod is there in case the Bic lighter fails. Although char cloth produces only an ember, and not flame, it is the easiest and most reliable way to start fire with a weak spark from a lighter, or strong spark, and it packs up tight. And unlike cotton balls and petroleum jelly, or other fuels and tinder, It can also be made in the field from any cotton material on hand. Yet there are many, many ways and many materials that could be used. Alcohol wipes are compact, and sealed, easily start with a spark, and produce a hot flame. I wood carry several types of materials, and some kindling, but foremost and always, is dry tinder, and other as needed to create redundancy in my kit, options in case, one way does not work.
The most important option in addition to a ferro rod, is material that one has a high degree of confidence in, that will start a fire in the worst conditions imaginable. After a drenching rain in the middle of the night when we are shivering from hypothermia might be the worst. If cotton balls smeared with Vaseline are what you got, those work good. However, if I must carry a road flare, the weight is worth it. Out there, fire is you best friend.
I like the idea but it looks to be a little heavy and awkward. I prefer small light weight bags. A small fanny pack will interfere less than the m1 belt does. But I prefer pockets. My Columbia fleece jacket has two deep inside pockets on each side that can easily carry the equivalent of the m1 belt.
Survivalblog has a number of articles about the “Gray Man” approach to travel/survival. … Deep inside >pockets on a coat helps with that approach. The past articles in Survivalblog are always worth another look.
Like you, I’d rather keep my contents more hidden. A standard cloth ammunition bandolier carried under the jacket (or shirt) can carry quite a bit. A smaller canteen – the 1 pint aviator’s flask, holding 16 oz, about 1 pound in weight.
Sounds like you have a good set-up. The link for “Ready Made Resources” on Survivalblog, has a Sawyer, Mini Water-Filter; it can repeatedly be used to fill the flask with clean water. … +A length of Paracord on the flask would make for a good handy Kbonker. [A stainless steel flask with a dent in it should still hold water.]
Just food for thought I carry fat wood pieces they work great for starting a fire.
Great article, thank you! I have two Altiod tins, one has fireproof (melted wax) over a match and toilet paper. The other one has cotton balls with vaseline all through them. I will be adding to my collection. Thanks again.
Great article.
On a similar vein, when I was in the service a SF sergeant taught me to use a M-16 ammo bandolier as my survival kit. They have 7 pockets and you can fill them with first aid packs, space blankets, MRE accessory pack (TP, matches and coffee), a small knife blade or scalpel blade and whatever else you would consider a necessity. I would wear this under my shirt, so it basically was always first on/last off. Even with my LBE and rucksack, it was never in the way.
Ever since then, I carry the bandolier when backpacking or doing search and rescue. It has held up amazingly well and if you buy surplus 5.56 ammo there is a good chance you already have some laying around.
A bit off topic, but I used to criticize John Garand for using an 8-round en bloc clip in his design instead of a 20-round magazine. After all, the magazine technology had been in use for decades. If a soldier had only 3 rounds left in a clip and needed, say, as many rounds as he could get before going through a door, he had no choice but to eject the clip and load an entirely new one.
A few years ago, I read in American Rifleman magazine that the Army didn’t want to spend money on all new ammo pouches for detachable magazines. The existing WWI ammo belts could handle en bloc clips just fine.
I fully expect that the meager 1930s defense budget that resulted in scarce Army resources was a prime motivator in the Army’s decision. Just imagine how much more effective the rifle would have been with a 20-round magazine. (Oh…wait…the Army did and, thus, the M14.)
Old School Versus New School Rifle Debate
It’s an interesting debate that will never end. I liked the enblock clip. Against bolt action rifles, it worked. Some would argue that it would have worked better with a 20 round mag. However, the tactics were also different back then, and mags add weight, and must be retained, and loaded, where as the clip is disposable and compact, and there was no magazine protruding, so the rifleman could stay closer to the ground. When well practiced, inserting the clip could be swiftly done, yet reduced the rate of fire enough that the rifle did not overheat. The heavier weight of the ammunition limited the amount one could carry, and the heavier 20 magazine fed rifle might encourage one to use it up, and run out before the guy with the 5 round bolt action rifle did. I believe they struck a sensible balance of attributes for the time.
However, the rifle is not as versatile in today’s maneuver warfare approach, where 30 round magazines can be a decisive advantage closer in. The Army’s training no longer stresses long range marksmanship. I believe it is best to be able to have the best of both worlds, and will attempt to turn the table around by first using marksman ship as game changer in world where 200 yards is now considered the maximum distant modern infantry might engage.
This winter I’ll be loading several thousand rounds of precision ammunition using mostly M2 cases for an accurized 03A3 with a minty 44′ barrel. The ammunition should out class 7.62 Nato. They’ll go into the old cotton bandoleers as well. Some things never go out of fashion, and this is where old age can be a match for youth, especially if the optic is good.
Water is Life, The Canteen
To keep on topic, I also rediscovered other wisdom of past, and found the old stainless steel 1 quart canteens, and cup, although heavy, are capable of boiling water to sanitized, not only the water, but the container as well. The system nested within itself back in WW1 and WW2, as well as it does today. There are high quality modern equivalents on the market for sale by those into bushcraft as I am still today. I believe my WW2 canteen augment made almost a decade ago, inspired the production of this:
https://www.selfrelianceoutfitters.com/collections/canteens
It is now been on the market for years, and the price is now reasonable. Combining the advantages of newer tech and older tech, we might derive the most. Although old and slow today, making a light weight 30 pound, or lighter pack a necessity, this is where weight is worth carrying. Steel is tough to melt. If my life straw fails or is lost, boiling water become necessary. We also need warm liquids and food, especially in a cold environment. To reduce weight, I might let the metal cup go, and use plastic there. Ounces do turn into pounds. The plastic cap on these, and WW2 era canteens, can be removed so that the canteen can be place into the coals, or hung over a fire.
Fire and water go together. If we have only a Bic lighter, a metal container for boiling water, a strong and sharp knife for making tinder, a small flashlight for finding firewood, and a light weight tarp and 50 feet of cordage or strong string, we can survive most situations. But for the 1 dollar lighter, all this can be purchased at the thrift store if need be for under 50 dollars including the pack. There is no reason not to have a Get Home Bag. If we can layer our packs and keep as much of this capability on our first layer as in the ammo belt detailed, or on our persons using any method of carry, then the odds of surviving bad times, greatly improve. A super light weight and compact version as explained in the article is an added advantage, and I believe worth the effort to build and wear even when working security. If you loose and must rally elsewhere, this will be with you. Thanks for the article. Good idea.
love this article! Ive been building these tin survival kits for the last 35 years. Ive actually USED one in the last 6 months. I was in town and forgot my wallet at home(20 miles away). It was lunch time and I was hungry. I pack a $20.00 bill in my tins. I ate lunch. I also wrap Electrical tape around the edges of the closed tin for water resistance. Used to pack iodine tabs for water purification, in a tiny zip lock bag. Not a good idea. The tabs gas off and rust the inside of the can and the razor blade something fierce.
I might recommend the toilet paper rolls that come in the MRE accessory packet instead of the tissues. They are highly compressed so you can carry more, and they are designed for the job. They will also fit in an Altoids tin.
I personally use the US 1 quart canteen with the nested stainless canteen cup. I want water with me and not worry about finding it first thing. They make a canteen cup stove that nests on the outside of the canteen cup.
http://www.google.com/imgres?imgurl=https://olive-drab.com/images/canteen_cup_stove_03_500.jpg&imgrefurl=https://olive-drab.com/od_soldiers_gear_canteen_cup_stove.php&h=341&w=360&tbnid=khKHsgZ_UYxDUM:&q=us+canteen+cup+stove&tbnh=90&tbnw=95&usg=AI4_-kSVyWolN6EUTSBrrxF12qGzpvz6LQ&vet=1&docid=Z7mc01I-6AJAVM&client=firefox-a&sa=X&ved=2ahUKEwjig6Cc2fHlAhUHVN8KHX4fDVcQ9QEwB3oECAAQCA
When inverted, the cup fits snugly into the stove and allows you to build a small fire under the cup. You can use heat tabs or burn leaves and twigs. All three fit in the standard canteen pouch. I bought one back when they first came out (the Army had them). I showed it to my sergeant major who ordered them for the entire battalion.
Hmm, I’ve had one of these belts for a while, knew it would come in handy for something one day. Gonna go out in the shop and find my tins and try this out.
What a fabulous article. I have a plan to turn your article into gifts by collecting all said goods, arranging separately in one box with a print out of your article and directions to “assemble.” The gift receiver will need to package tins and belt themselves, thereby knowing what they have and where.
My personal favorite quotes were from Frank Herbert:
“I must not fear. Fear is the mind-killer. Fear is the little death that brings total obliteration.”
and your:
“Panic kills more people than thirst, freezing cold, or grizzly bears. It makes you forget what you know so you end up making a bad situation worse.”
I believe God knew we would be spiritually attacked with arrows of fear, so He told us many times, “Do not fear, do not be afraid.” I wish it was just as easy as agreeing God is right. Sometimes I don’t realize I’ve been hit. I lift up my eyes and heart to Him for strength and faith.
Lastly, is there a trick to waterproofing matches with nail polish or is it as simple as painting the end?
Regarding fear, this is one of my anthem songs for 2020 and moving to the Redoubt:
“Burn the Ships,” by King and Country
https://youtu.be/lv5JiNZ6rhY
Seriously, I love the article, very high utility in a small space. Thank for taking the time to put this together. Must be my age, I kept trying to figure out how to name each item “bat something”. Bat medic box, bat fishing kit, etc.
The article brought back memories. In 1972 with the Boy Scouts I did a “Indian Wilderness Survival” course and my 2 kits were in Altoid cans. A fishing kit and a ‘survival kit’. Now for actually using the M1 Garand and needing belts etc, I use Olongapo outfitters here is the link:
https://olongapooutfitters.com/equipment-and-gear/garand-belt-pouch-clone/
Top notch stuff. RE: Tunnel Rabbit’s comment, (whom I respect greatly). I use the plastic canteen with the metal cup and find that heating the metal cup for coffee/tea is much easier than heating a metal canteen in the field. (Actually, used this weekend). Kinda of Vietnam era usage, as the younger folk have transitioned to camelbacks. No doubt about it that a ferro rod, a sheath knife, bic lighter, head lamp and siltarp with paracord can make a world of difference!
To Ozark Redneck,
One could very well boil water and fill a plastic canteen, yet assuming that we are in a dangerous environment, and if I only have a few moments to fill up and no time to boil it up in the cup at the water hole, then my plastic canteen could become contaminated. It would then not to be possible to carry 1 quart, and drink from it when time and place allowed the user to boil it. It could be, however, that boiling hot water, quickly dumped into a plastic canteen, and then shaken vigorously, might be enough to kill off bacteria. It might be, if done correctly. I just do not know that for a fact.
All this assumes that we would be in an austere environment, with no access to modern filters, or chemicals to disinfect. If I had my IFAK with me, it also contains 2% Tincture of Iodine, metronidazole, a Z-Pack (Azithromycin) to handle water borne bacteria, should unfiltered or water that was not disinfected had to be consumed, and as prevention from infection from dirty wounds. 16 drops of 2% Tincture of Iodine in a one quart water would disinfect that water, and the container, in freezing temperatures in about 45 minutes. Less time, or half the Iodine would be needed at 70 degrees F.
Of course, I’d rather have my steel cup too, but if only if I had to dump one, I would prefer the steel canteen if I had no chemical means to disinfect a water container capable of traveling. The plastic ones are very light in weight in comparison. BTW, the old Trioxane tabs, the large ones, do a good job at boiling water, even in the snow, in about 6 minutes. I do not know if it is still available. These are the best guaranteed way to start fire even if all you have is a weak spark from an empty lighter. The same trick can be done with an inexpensive and widely available alternative that comes in small water proof 1″x 1″ aluminium wrappers, that are alcohol wipes. These can be stuffed anywhere. Good for starting fires, or wiping just about anything, anywhere. Most things should be dual purpose if at all possible.
If they only find my body, as a reminder, it will have some of their great grandfather’s equipment strapped to it, or in my hands.
Plastic chew cans work for mini kits too!
I remember reading some months back of a metal cup from a Spanish army kit that fit the U.S. Aviator’s 1 pint flask. But they are rather difficult to find it appears. Here is a link to the thread:
https://bushcraftusa.com/forum/threads/usgi-1-pint-pilot-flask-cup.123668/
If this is against policy of this blog, my apologies. I was just attempting to spread more knowledge. Please delete the link if not accepted.